VirtualBox can be set to accept booting from USB. This is purposed to test the recovery USB stick. Instead of booting from the real machine, you can boot the USB recovery stick from the virtual machine so it is easier to fix the USB. This is very useful for making a booting USB like in my earlier post, "Multiboot USB with 15 instances".
There are 2 methods to boot the USB in virtualbox. First, we can use PloP as an ISO image to attach to the CD ROM drive of any OS in the virtualbox. Then we add our real USB in the USB setting of Virtualbox. (Don't check Enable USB2 box because PloP doesn't support it.) When used, this USB will be seen by the Virtualbox OS only. This method can be used with any bootable USB. The problem is that it is very slow to boot an OS in the USB because PloP allows connecting with USB1 only.
The second method is creating virtual USB device from the real USB with this command:
VBoxManage internalcommands createrawvmdk -filename "%USERPROFILE%"\.VirtualBox\usb.vmdk -rawdisk \\.\PhysicalDrive#
where # is the USB disk number (looked in Windows Disk Management.). The virtual USB is usb.vmdk file. This can be added in Virtualbox as an existing hard drive.
Don't add our real USB in the Virtualbox USB setting as the USB needs to be seen from the host windows.
Note that this virtual USB will use with the USB that you created with only. The order of plugging the USB is also important. This has to be the order to make the USB the right PhysicalDrive number. It means if you fail to do this, i.e. changing from 8G to 4G or plugging the USB the wrong order, the system won't boot. Therefore, it is a good idea to name this Virtualbox OS to be something meaningful like "Virtual USB 8G Disk2". The advantage of this method is that the USB speed is much faster than the first one. This is the method of my choice.
Last but not least, you need to set Virtualbox base memory and video memory to some extent; otherwise, some OS won't boot up. I am using 2048M for the base memory, and 32M for the video memory.
Wednesday, January 16, 2013

Wednesday, May 04, 2011
"Could not load file or assembly MOM.Implementation..."
After I had installed the latest graphic drivers from ATI, every time I right-clicked on the desktop, and selected "Graphic properties", this annoying message
showed up. The message itself caused little problem. However, the real problem was I could not adjust any graphic properties even with the basic settings like screen resolution and color depth, let alone other advanced features like 3D settings such as AA, AF, and so on. I can use my PC just fine but what is the point of installing a new driver if you cannot fully utilize its advanced features? So instead of let it be as it is, I was busy trying to make it work. It was painstaking but finally I managed to put this error away. Here is how I do it.
You will need 2 free, external helpers, DriverSweeper and CCleaner.
First, you'll do as you normally do: uninstall all the old ATI drivers with its own uninstaller in Control Panel/Uninstall of Windows. Unfortunately, this is not enough. The ATI uninstaller have a bad habit to leave many leftovers behind, and this causes the problems. So we need to do more cleaning. This can be done by using DriverSweeper. Open DriverSweeper, select ATI option and clean it. This will clean not only the ATI files but also the related branches in the registry. The last step, use CCleaner/Registry to clean more of the registry. Repeat CCleaner until it says there is nothing more to clean.
After all the cleaning is done, it is time to install the new ATI drivers. Restart your machine, and proceed to install them. The installation should go smoothly. Don't forget to check whether or not that annoying message is gone for good. I bet it will.
"Could not load file or assembly MOM.Implementation..."
showed up. The message itself caused little problem. However, the real problem was I could not adjust any graphic properties even with the basic settings like screen resolution and color depth, let alone other advanced features like 3D settings such as AA, AF, and so on. I can use my PC just fine but what is the point of installing a new driver if you cannot fully utilize its advanced features? So instead of let it be as it is, I was busy trying to make it work. It was painstaking but finally I managed to put this error away. Here is how I do it.
You will need 2 free, external helpers, DriverSweeper and CCleaner.
First, you'll do as you normally do: uninstall all the old ATI drivers with its own uninstaller in Control Panel/Uninstall of Windows. Unfortunately, this is not enough. The ATI uninstaller have a bad habit to leave many leftovers behind, and this causes the problems. So we need to do more cleaning. This can be done by using DriverSweeper. Open DriverSweeper, select ATI option and clean it. This will clean not only the ATI files but also the related branches in the registry. The last step, use CCleaner/Registry to clean more of the registry. Repeat CCleaner until it says there is nothing more to clean.
After all the cleaning is done, it is time to install the new ATI drivers. Restart your machine, and proceed to install them. The installation should go smoothly. Don't forget to check whether or not that annoying message is gone for good. I bet it will.
Tuesday, March 08, 2011
Renaming several files to a list of text names
There is a situation that you may want to rename several files to a list of text names. For example, you have a series of a TV show listed as
and want to rename these files to
- AS01E01_Debut show.avi
- AS01E02_She is here.avi
- AS01E03_He is there.avi
You can see that the names we want to change to are not in any pattern. This is a problem for most auto-rename softwares, which needs at least some patterns of texts to replace some parts of the old names.
Fortunately, this problem can be solved easily with this tiny, free software called Text to File Renamer (V 2.1). It is very easy to use. First, you drag your files to the left panel. Second, you paste the list of the names you want to rename to the right. Then the final step, you just click the last button. It’s that simple!

One quick note, you may find another free program to complement this action. It is called Filemenu Tools. One of its commands can be used to copy only the file names of the selected files. If you want to change the names of one set of files with another set of the files, you can use this tool to copy the file names of the latter set, then paste it into the right panel of Text to File Renamer. Very very handy tool.
Note: For this kind of work, you can try a program call Renamer. (Yes, It is free too.) It is very powerful, which can do many many things about changing names. It is no doubt a first-rated utility, but you may need time to learn how to use it.
Sunday, February 13, 2011
No sound transferred from a notebook to TV with HDMI connection
My notebook is Acer TimelineX 4820TG, Windows 7 64 with Realtek audio hardwares. It has a HDMI port, and I use it to connect to my plasma TV. It does its job beautifully transferring both video and sound with only one cable connection. Recently, I found that many times the sound didn't come out from the TV speakers. The pictures from my notebook came out to TV ok but not for the sound. After spending hours of internet searching and trying, I finally managed to fix it. If you experience something like that, try this:
Go to Device Manager in Control Panel
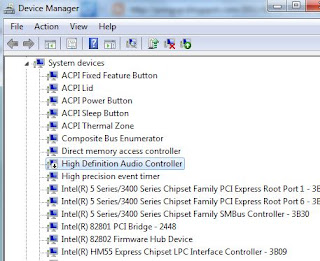
Go to System Devices (not Sound, video and game controller branch as you might think) and look for High Definition Audio controller that marked with an arrow icon indicating this device is not working properly or is disable. Fix it there by updating the drivers or just enable it.
Now when you connect HDMI to TV, if it hasn't any sound on TV, go to a Sound setting in Control Panel (or you can go to a speaker icon on the tray, then right click it) and select Playback devices. Right there, you should see HDMI sound output. Select it and click Make Default.
Go to Device Manager in Control Panel
Go to System Devices (not Sound, video and game controller branch as you might think) and look for High Definition Audio controller that marked with an arrow icon indicating this device is not working properly or is disable. Fix it there by updating the drivers or just enable it.

Now when you connect HDMI to TV, if it hasn't any sound on TV, go to a Sound setting in Control Panel (or you can go to a speaker icon on the tray, then right click it) and select Playback devices. Right there, you should see HDMI sound output. Select it and click Make Default.
Sunday, October 17, 2010
Multiboot USB with 15 bootable instances (Updated)
OK. There are a lot of tutorials about how to make a multipleboot USB. Why do I have to make one myself? The answer is that most tutorials are very confusing and they won't explain the reason behind those instructions lines. Here is my own version. If you feel it is familiar, that's because I collect all these information from the internet.
Note this uses GRUB4DOS as a boot loader to load an OS, and there is no partitioning of USB involved. Obviously, this is an advantage over other methods. The USB size should be at least 8G.
Words of warning: The files in USB can be corrupted easily as you may be forced to shut down the system in case you cannot boot up the system as expected. I recommend to back up all the file in USB. If something used to work before, then suddenly goes wrong, just repeat step 1 and 2, and copy everything in the backup to the USB.
Tools: HP USB Disk Storage Format Tool 2.2.3, Syslinux, Grub4dos
Objectives: Making a USB bootable with 15 instances: DOS, Hiren Boot CD, Hiren Mini XP, UBCD for Win, Ubuntu, Part Magic, AVG, Kaspersky, Dr Web, Avira Antivir, MS Data recovery XP-Win7, WindowsKey and so on.
Step 1: Make a USB
Use HP utility to format the USB stick. Use this tool to format the USB stick because it will prepare the stick's boot sector properly just for the next step.
Step 2: Install SYSLINUX boot loader into the mbr of the USB, using command syslinux -m -a X: , which X is a USB drive. After install the syslinux bootloader, a file ldlinux.sys will be created in the root of USB. (Note that you may try using GRUB bootloader but I found using GRUB cause nonbooting with AVG rescue CD iso. See Update***)
Step 3: Copy GRUB shell into USB
GRUB shell is GRUB.EXE, we have to copy GRUB.EXE into the root of USB, then create a text file syslinux.cfg. Call GRUB.EXE with these lines in a syslinux.cfg file.
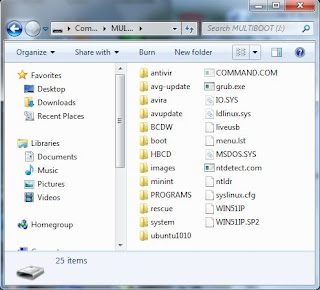
Now your USB root should have 3 files, ldlinux.sys, syslinux.cfg and grub.exe
(If you use GRUB bootloader, copy GRLDR into the root of USB instead of grub.exe.)
***UPDATE Step 2-3 Install New GRUB bootloader and GLDR
New grub4dos 0.4.5c (2013-01-13) has been released. I found it works really well. It can now boot the new Knoppix7 ISO, and does not have any issue with AVG ISO. After formatting the USB in Step 1, you can install grub bootloader and gldr to your USB in one step using RMPrepUSB (Set Partition size to MAX, Bootloader option to MSDOS, File system to FAT32/ Boot as HDD, and click Install Grub4Dos.) Note that RMPrepUSB has already included the new grub bootloader and glrdr in its package so you don't have to separately download the new grub again. Another way to install GRUB bootloader is to use BOOTLACE.COM included with grub4dos package. Use BOOTLACE.COM 0x80 to install the bootloader to disk0, use BOOTLACE.COM 0x81 to install the bootloader to disk1, and so on. Check the disk number with MBRWIZ.
After this step, your USB should have only 1 file, glrdr.
Step4: Set the first boot, Windows98 MSDOS
Now we are ready for the first boot menu, windows98 DOS. Copy these files from win98 CD into the root of USB, MSDOS.SYS, IO.SYS and COMMAND.COM
Create a text menu file to call this boot stance by putting these lines into a text menu.lst file:
The first 3 lines are for appearance's setting. Next two title entries are for power off and restart the machine.
The next lines can be explained as following:
title DOS Win98 Boot :The display boot menu.
rootnoverify (hd0,0) :Set the first hard disk (the USB stick itself in this case) and first partition as root without mounting disk.
chainloader /io.sys :Load io.sys in the root to boot.
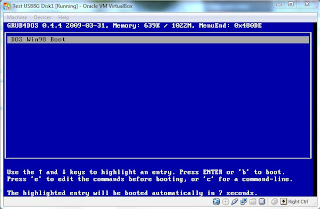
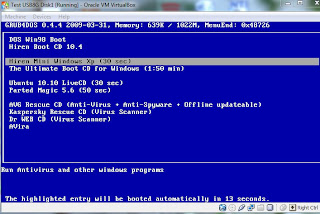
After reboot with this USB, you should get this screen.
Step 5: Set Hiren Boot CD, Hiren Mini XP
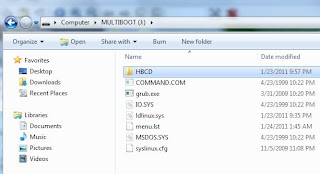
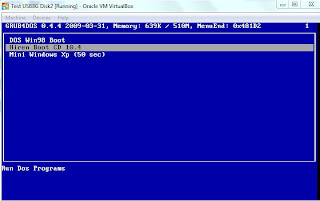
Copy HBCD folder in a Hiren Boot CD into the root of USB drive. Note that we do not boot Hiren from the ISO, but we boot it from its boot file. Add the following lines in the menu.lst file:
Step6: Set UBCD for Windows
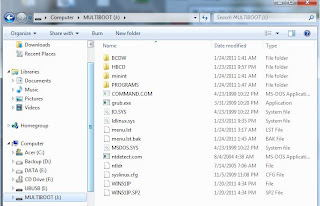
We need another USB drive. Create UBCD4Win with UBUSB.EXE to the new USB drive. Then copy the following files and folders from the UBCD4Win USB to our USB:
Folders: UBCDW, MININT, PROGRAMS
Files: ntdetect.com, ntldr, win51ip, win51ip.sp2
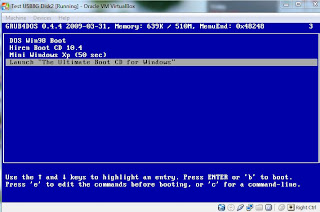
Add the following lines to our menu.lst:
Step 7: Set UBuntu
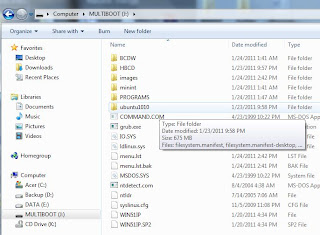
Create a folder for UBUNTU e.g. ubuntu1010 in the root of USB drive, and extract 6 following files-- filesystem.manifest, filesystem.manifest-desktop, filesystem.size, file system.squashfs, initrd.lz and vmlinuz from UBUNTU iso CD into this folder.
Add the following lines in menu.lst
Step 8: Set Parted Magic
Create a folder images in the root of USB drive, and copy partedmagic iso into this folder
Add the following lines in menu.lst
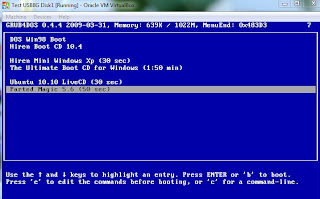
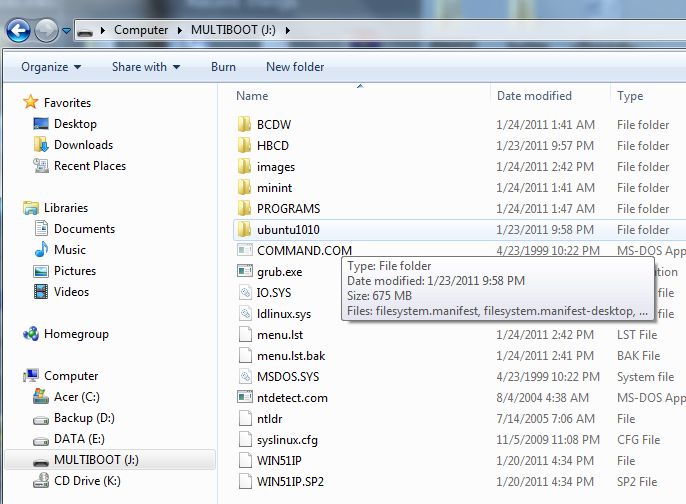
Now you USB should have 2 G used, and 6 menus showing up in the USB root directory.
Step 9: Set AVG antivirus rescue CD (On/off line update)
Download AVG antivirus rescue CD and copy into images folder of our USB
Create avg-update directory for keeping the virus database. This is not a must, but it is good to have a specific directory for downloading virus definition.
Add the following lines in menu.lst
Step 10: Set KAPERKY RESCUE CD (On/off line update)
This rescue CD can be updated online inside the program or offline by downloading a new iso.
Rename "kav_rescue.iso" to rescue.iso, and put it in a newly created RESCUE folder
Create a zero file named liveusb in the root of USB.
Add the following lines in menu.lst
Step 11: Set Dr WEB Live USB
You will need an extra USB. Download DrWebLiveUSB.EXE and make a DrWebLiveUSB to this USB.
Copy the whole boot directory to the root of our USB
Add the following lines in menu.lst
Edit ID=xxxxxxxxxxxxxx as the same in isolinux.cfg (Text in the line starting with kernel as the same as in syslinux.cfg without ID=)
Step 12: Set AVIRA AntiVir Live CD (Online update)
Prepare an extra USB.
Download avira rescue cd iso and make USB version by UnetBootin on the extra USB.
Copy 3 folders (avupdate, antivir, and system) from the extra USB to the root of our USB
Add the following lines in menu.lst
Step 13 Add F-Secure (On/offline update)
Download F-secure rescue cd iso. Use UNetBootin to make a spared USB bootable. Copy boot/isolinux and Knoppix directory in the root of our USB. Notice the text file, syslinux.cfg. It should have these lines of codes:
label ubnentry0
menu label rescuecd
kernel /boot/isolinux/fsecure/linux
append initrd=/boot/isolinux/fsecure/minirt.gz ramdisk_size=100000 lang=en vt.default_utf8=0 apm=power-off vga=normal quiet nomce loglevel=1 nolapic_timer nosound console=tty10 video=noblank
Now we will adapt this code into grub4dos of our menu.lst as follows:
If the system can connect to the internet, the virus database can be updated online. If not, it can be updated offline by put the virus database into the main root of the USB, downloaded from
http://download.f-secure.com/latest/fsdbupdate9-packed.run
Step 14 Add Panda Safe CD
Download Panda SafeCD iso, then extract all files in directory "live" to a folder "panda" in your USB stick, then add these lines in "menu.lst".
Step 15 Add Bitdefender Live CD
Step 16 Add Knoppix Live CD
Step 17 Add
Note this uses GRUB4DOS as a boot loader to load an OS, and there is no partitioning of USB involved. Obviously, this is an advantage over other methods. The USB size should be at least 8G.
Words of warning: The files in USB can be corrupted easily as you may be forced to shut down the system in case you cannot boot up the system as expected. I recommend to back up all the file in USB. If something used to work before, then suddenly goes wrong, just repeat step 1 and 2, and copy everything in the backup to the USB.
Tools: HP USB Disk Storage Format Tool 2.2.3, Syslinux, Grub4dos
Objectives: Making a USB bootable with 15 instances: DOS, Hiren Boot CD, Hiren Mini XP, UBCD for Win, Ubuntu, Part Magic, AVG, Kaspersky, Dr Web, Avira Antivir, MS Data recovery XP-Win7, WindowsKey and so on.
Step 1: Make a USB
Use HP utility to format the USB stick. Use this tool to format the USB stick because it will prepare the stick's boot sector properly just for the next step.
Step 2: Install SYSLINUX boot loader into the mbr of the USB, using command syslinux -m -a X: , which X is a USB drive. After install the syslinux bootloader, a file ldlinux.sys will be created in the root of USB. (Note that you may try using GRUB bootloader but I found using GRUB cause nonbooting with AVG rescue CD iso. See Update***)
Step 3: Copy GRUB shell into USB
GRUB shell is GRUB.EXE, we have to copy GRUB.EXE into the root of USB, then create a text file syslinux.cfg. Call GRUB.EXE with these lines in a syslinux.cfg file.
default grub
LABEL grub
KERNEL grub.exe
Now your USB root should have 3 files, ldlinux.sys, syslinux.cfg and grub.exe
(If you use GRUB bootloader, copy GRLDR into the root of USB instead of grub.exe.)
***UPDATE Step 2-3 Install New GRUB bootloader and GLDR
New grub4dos 0.4.5c (2013-01-13) has been released. I found it works really well. It can now boot the new Knoppix7 ISO, and does not have any issue with AVG ISO. After formatting the USB in Step 1, you can install grub bootloader and gldr to your USB in one step using RMPrepUSB (Set Partition size to MAX, Bootloader option to MSDOS, File system to FAT32/ Boot as HDD, and click Install Grub4Dos.) Note that RMPrepUSB has already included the new grub bootloader and glrdr in its package so you don't have to separately download the new grub again. Another way to install GRUB bootloader is to use BOOTLACE.COM included with grub4dos package. Use BOOTLACE.COM 0x80 to install the bootloader to disk0, use BOOTLACE.COM 0x81 to install the bootloader to disk1, and so on. Check the disk number with MBRWIZ.
After this step, your USB should have only 1 file, glrdr.
Step4: Set the first boot, Windows98 MSDOS
Now we are ready for the first boot menu, windows98 DOS. Copy these files from win98 CD into the root of USB, MSDOS.SYS, IO.SYS and COMMAND.COM
Create a text menu file to call this boot stance by putting these lines into a text menu.lst file:
color white/blue black/light-gray
timeout 20
default 5
title Shut down
halt
title Reboot
reboot
title DOS Win98 Boot
rootnoverify (hd0,0)
chainloader /io.sys
The first 3 lines are for appearance's setting. Next two title entries are for power off and restart the machine.
The next lines can be explained as following:
title DOS Win98 Boot :The display boot menu.
rootnoverify (hd0,0) :Set the first hard disk (the USB stick itself in this case) and first partition as root without mounting disk.
chainloader /io.sys :Load io.sys in the root to boot.
After reboot with this USB, you should get this screen.

Step 5: Set Hiren Boot CD, Hiren Mini XP
Copy HBCD folder in a Hiren Boot CD into the root of USB drive. Note that we do not boot Hiren from the ISO, but we boot it from its boot file. Add the following lines in the menu.lst file:
title Hiren Boot CD 10.4\nRun Dos Programs
find --set-root /HBCD/boot.gz
kernel /HBCD/memdisk
initrd /HBCD/boot.gz
title Mini Windows Xp (50 sec)\nRun Antivirus and other windows programs
find --set-root /HBCD/XPLOADER.BIN
chainloader /HBCD/XPLOADER.BIN


Step6: Set UBCD for Windows
We need another USB drive. Create UBCD4Win with UBUSB.EXE to the new USB drive. Then copy the following files and folders from the UBCD4Win USB to our USB:
Folders: UBCDW, MININT, PROGRAMS
Files: ntdetect.com, ntldr, win51ip, win51ip.sp2
Add the following lines to our menu.lst:
title Launch "The Ultimate Boot CD for Windows"
fallback 1
find --set-root /ntldr
chainloader /ntldr
savedefault --wait=2


Step 7: Set UBuntu
Create a folder for UBUNTU e.g. ubuntu1010 in the root of USB drive, and extract 6 following files-- filesystem.manifest, filesystem.manifest-desktop, filesystem.size, file system.squashfs, initrd.lz and vmlinuz from UBUNTU iso CD into this folder.
Add the following lines in menu.lst
#This is for a spaceCaution: Ubuntu 10.10 has a problem with directory named "sources". I don't know why. If your USB has a directory named "sources" anywhere in the USB, it won't load Ubuntu. Strange. At least, I'm glad I found why sometime I can't load Ubuntu. It has bugged me for long time.
title
root
title Ubuntu 10.10 LiveCD (30 sec)
find --set-root /ubuntu1010/initrd.lz
kernel /ubuntu1010/vmlinuz boot=casper live-media-path=/ubuntu1010/ ignore_uuid
initrd /ubuntu1010/initrd.lz
Step 8: Set Parted Magic
Create a folder images in the root of USB drive, and copy partedmagic iso into this folder
Add the following lines in menu.lst
title Parted Magic 5.6 (50 sec)
find --set-root /images/pmagic-5.6.iso
map --heads=0 --sectors-per-track=0 /images/pmagic-5.6.iso (hd32)
map --hook
root (hd32)
chainloader (hd32)
Now you USB should have 2 G used, and 6 menus showing up in the USB root directory.

Step 9: Set AVG antivirus rescue CD (On/off line update)
Download AVG antivirus rescue CD and copy into images folder of our USB
Create avg-update directory for keeping the virus database. This is not a must, but it is good to have a specific directory for downloading virus definition.
Add the following lines in menu.lst
#This is for a spaceThis antivirus rescue CD can be updated online/offline. To update it, select Update, then select Online, Offline or Download.
title
root
title AVG Rescue CD (Anti-Virus + Anti-Spyware)
find --set-root /images/avg.iso
map /images/avg.iso (hd32)
map --hook
chainloader (hd32)
This rescue CD can be updated online inside the program or offline by downloading a new iso.
Rename "kav_rescue.iso" to rescue.iso, and put it in a newly created RESCUE folder
Create a zero file named liveusb in the root of USB.
Add the following lines in menu.lst
title Kaspersky Rescue CD (Virus Scanner)\nUpdated by downloading the new iso, rename it to rescue.iso, and replace the old iso in a rescue directoryThis program doesn't work on all systems, e.g. on some notebooks. Still don't know why.
find --set-root /rescue/rescue.iso
map /rescue/rescue.iso (0xff)
map --hook
root (0xff)
chainloader (0xff)
Add the following lines in menu.lst
Edit ID=xxxxxxxxxxxxxx as the same in isolinux.cfg (Text in the line starting with kernel as the same as in syslinux.cfg without ID=)
title Dr WEB CD (Virus Scanner)\nUpdated by downloading the new iso, and extract boot directory to the root of USB
find --set-root /boot/initrd
kernel /boot/vmlinuz ID=WfHmREDlRSXOT6wb root=/dev/ram0 init=/linuxrc init_opts=4 quiet dokeymap looptype=squashfs loop=/boot/module/white.mo usbroot slowusb vga=791 splash=silent,theme:drweb CONSOLE=/dev/tty1
initrd=/boot/initrd
Step 12: Set AVIRA AntiVir Live CD (Online update)
Prepare an extra USB.
Download avira rescue cd iso and make USB version by UnetBootin on the extra USB.
Copy 3 folders (avupdate, antivir, and system) from the extra USB to the root of our USB
Add the following lines in menu.lst
title AViraThis program can be updated online only.
find --set-root /avira/initrd.gz
kernel /avira/vmlinuz nofb ramdisk_size=108178 root=/dev/ram0 rw console=/dev/vc/4
initrd /avira/initrd.gz


menu label rescuecd
kernel /boot/isolinux/fsecure/linux
append initrd=/boot/isolinux/fsecure/minirt.gz ramdisk_size=100000 lang=en vt.default_utf8=0 apm=power-off vga=normal quiet nomce loglevel=1 nolapic_timer nosound console=tty10 video=noblank
title F-Secure Rescue CD
find --set-root /boot/isolinux/fsecure/minirt.gz
kernel /boot/isolinux/fsecure/linux ramdisk_size=100000 lang=en vt.default_utf8=0 apm=power-off vga=normal quiet nomce loglevel=1 nolapic_timer nosound console=tty10 video=noblank
initrd /boot/isolinux/fsecure/minirt.gz
http://download.f-secure.com/latest/fsdbupdate9-packed.run
Step 14 Add Panda Safe CD
Download Panda SafeCD iso, then extract all files in directory "live" to a folder "panda" in your USB stick, then add these lines in "menu.lst".
title Panda Safe CD (20 sec)
find --set-root /panda/initrd1.img
kernel /panda/vmlinuz1 boot=live live-media-path=/panda/ ignore_uuid
initrd /panda/initrd1.img
Step 15 Add Bitdefender Live CD
Step 16 Add Knoppix Live CD
Step 17 Add
Thursday, October 14, 2010
Incompressible and compressible flow
Have you ever been confused which one is compressible or incompressible flow in fluid dynamic course ? The importance of these flows is mentioned in the Bernoulli's equation, which stated that it is valid only with incompressible flow.
I used to think that compressible flow is the flow of gas, and incompressible flow is the flow of liquid. As everyone knows gas is compressible but liquid is incompressible, that's why I came up with that idea.
But I was wrong. It turns out that flow of gas could be incompressible flow too, and it is usually so!, because most flows are well below the speed of sound. That means Bernoulli's equation can be applied for both liquid and gas flows. Check this out from Wiki:
So this is just a reminder, at least for myself.
I used to think that compressible flow is the flow of gas, and incompressible flow is the flow of liquid. As everyone knows gas is compressible but liquid is incompressible, that's why I came up with that idea.
But I was wrong. It turns out that flow of gas could be incompressible flow too, and it is usually so!, because most flows are well below the speed of sound. That means Bernoulli's equation can be applied for both liquid and gas flows. Check this out from Wiki:
For flow of gases, to determine whether to use compressible or incompressible fluid dynamics, the Mach number of the flow is to be evaluated. As a rough guide, compressible effects can be ignored at Mach numbers below approximately 0.3. For liquids, whether the incompressible assumption is valid depends on the fluid properties (specifically the critical pressure and temperature of the fluid) and the flow conditions (how close to the critical pressure the actual flow pressure becomes).
So this is just a reminder, at least for myself.
Monday, March 05, 2007
Printing a long web page (again)
Do we really need the FinePrint as I mentioned in the below post ? The answer is yes or no.
If you click "page setup" in your printer properties, and you can select the paper size you need, or even better, it let you make a custom size, you are good without FinePrint. The idea of printing a long and wide web page is selecting a larger paper size to accomodate the content of the page.
If in your "page setup" properties doesn't have a paper size you want, you can try to make one by:
Go to "Printer and Fax"
Click File/Server properties"
Add your custom paper size.
Click OK until you go out to the normal screen.
Now go back to the "page setup" again, and see if your new paper size show up in the drop down list. If you find it there, congrat, you are now ready to print.
The problem is that not every printer can accept this change. In fact, only a small number of the printer (mostly new printers) can be done by this setting. You may try to download a new driver. If you try what I suggested here and it doesn't work, I guess you'll need a FinePrint.
I also have my eyes for the alternatives to the FinePrint, but I haven't found one. Too bad.
If you click "page setup" in your printer properties, and you can select the paper size you need, or even better, it let you make a custom size, you are good without FinePrint. The idea of printing a long and wide web page is selecting a larger paper size to accomodate the content of the page.
If in your "page setup" properties doesn't have a paper size you want, you can try to make one by:
Go to "Printer and Fax"
Click File/Server properties"
Add your custom paper size.
Click OK until you go out to the normal screen.
Now go back to the "page setup" again, and see if your new paper size show up in the drop down list. If you find it there, congrat, you are now ready to print.
The problem is that not every printer can accept this change. In fact, only a small number of the printer (mostly new printers) can be done by this setting. You may try to download a new driver. If you try what I suggested here and it doesn't work, I guess you'll need a FinePrint.
I also have my eyes for the alternatives to the FinePrint, but I haven't found one. Too bad.
Saturday, February 24, 2007
My top ten cool, free little things !
I have used a lot of softwares, a lot of utilities on my computer. For these softwares, the more features they have, the bigger they become. Luckily, the coolest softwares are not always the biggest ones. Check out my top ten coolest utilities (not in order). Each one takes up less than 1 MB of space. Some of them are as small as 24 KB. What's more, they are all free !
AlwaysOnTopMaker (24KB) --Make a window be always on top
Asterisk Logger (25KB) --Show a password behind the asterisks.
DeskWin (107KB) -- Make 4 virtual desktops.
Unlocker (183KB) -- Unlock file that uses by other files.
Restoration (200KB) -- Undelete the deleted files.
FolderSize (309KB) -- Show the size of the folder, fast.
LClock (330KB) -- Tray clock with reminders.
Process Explorer (584KB) -- Show what processes running in the background.
Agent Ransack (792KB) -- Find files fast
ZSoft Uninstaller (887KB) -- Uninstall the existing programs.
AlwaysOnTopMaker (24KB) --Make a window be always on top
Asterisk Logger (25KB) --Show a password behind the asterisks.
DeskWin (107KB) -- Make 4 virtual desktops.
Unlocker (183KB) -- Unlock file that uses by other files.
Restoration (200KB) -- Undelete the deleted files.
FolderSize (309KB) -- Show the size of the folder, fast.
LClock (330KB) -- Tray clock with reminders.
Process Explorer (584KB) -- Show what processes running in the background.
Agent Ransack (792KB) -- Find files fast
ZSoft Uninstaller (887KB) -- Uninstall the existing programs.
Tuesday, February 13, 2007
MP4 and Xvid
I have a lot of movies encoded with xvid and Divx. Theses formats can encode one movie to fit into 1 CD (700M) with acceptable quality (VCD / VHS quality). It was 4 years ago when I started using these formats to encode my movies. The tools I used at the time are DVDDecrypter to copy the DVD movie to a harddisk, Vidomi with Xvid/Divx and Lame mp3 to encode the movie and the audio, and finally Subrip to extract the subtitle. Each step must be done separately. The total processes normally take 4-5 hr for 1 encoded movie. The encoded movies can be played in my LG DVD player very well. But you can imagine how much hassle I have to overcome.
This is not the case any more in 2007.
With a lot of things have developed for the past years, the Xvid/Divx are kinds of dated now in 2007. Now movie lovers found better alternatives in MP4, movie format and AAC, audio format. I tried it and found MP4 gave me better quality i.e. less blocky images. I also used the lower bitrate of AAC to encode the audio like 96 Kbps, and I couldn't hear the difference compared to my normally used 128 Kbps of MP3. With 96 KBps of AAC and 1 CD (700M) of video encoded with MP4, I got better quality than encoding with XVid/Divx. These new formats also are supported in the new media portable player like iPod. The only downside is its still long encoded time. It will take 4 hr to encode one movie. However, you-set-it-and-forget-it procedure from a new tool I found makes it more attractive than the procedures I used to use.
The tool I mentioned is DVDFab platinum, and it will be only thing you need. It is very starightforward and easy to use. It can also rip a subtitle in VobSub format (sub/idx extensions). I yet haven't tried other tools that can encode movies in MP4/AAC formats, but I think no matter the tools you used, as long as you use the same settings, the quality of the encoded movies shouldn't be much different.
My last conclusion is next time when you want to backup your DVD, use MP4/AAC.
This is not the case any more in 2007.
With a lot of things have developed for the past years, the Xvid/Divx are kinds of dated now in 2007. Now movie lovers found better alternatives in MP4, movie format and AAC, audio format. I tried it and found MP4 gave me better quality i.e. less blocky images. I also used the lower bitrate of AAC to encode the audio like 96 Kbps, and I couldn't hear the difference compared to my normally used 128 Kbps of MP3. With 96 KBps of AAC and 1 CD (700M) of video encoded with MP4, I got better quality than encoding with XVid/Divx. These new formats also are supported in the new media portable player like iPod. The only downside is its still long encoded time. It will take 4 hr to encode one movie. However, you-set-it-and-forget-it procedure from a new tool I found makes it more attractive than the procedures I used to use.
The tool I mentioned is DVDFab platinum, and it will be only thing you need. It is very starightforward and easy to use. It can also rip a subtitle in VobSub format (sub/idx extensions). I yet haven't tried other tools that can encode movies in MP4/AAC formats, but I think no matter the tools you used, as long as you use the same settings, the quality of the encoded movies shouldn't be much different.
My last conclusion is next time when you want to backup your DVD, use MP4/AAC.
Monday, July 31, 2006
Subnet Mask Calculation
This is memo for myself.
Subnet mask is properly grouping the IP of the machimes together so it can communicate among others. Subnet mask will be something like this:
255.255.255.0 or 255.255.255.128 or 255.255.255.192 or 255.255.255.224 ..so on.
Note the last segment which has binary number as 00000000, 10000000, 11000000, 11100000,.... repectively.
Subnet mask above is showing the first 3 segments as a network address and the last segment as a host address. The host address is related to the IP of other computers.
For example, we have one host, which its IP is 192.168.2.1 in the subnet mask of 255.255.255.0. We can have group of other IP in the same network address which they can communicate each other from
192.168.2.0 - 192.168.2.255.
However, it is a good idea to leave out the first and the last IP because most firewall will use these two for specific purposes.
For how to calculate this group, check out this link.
For how to use it into the firewall, check this link.
Subnet mask is properly grouping the IP of the machimes together so it can communicate among others. Subnet mask will be something like this:
255.255.255.0 or 255.255.255.128 or 255.255.255.192 or 255.255.255.224 ..so on.
Note the last segment which has binary number as 00000000, 10000000, 11000000, 11100000,.... repectively.
Subnet mask above is showing the first 3 segments as a network address and the last segment as a host address. The host address is related to the IP of other computers.
For example, we have one host, which its IP is 192.168.2.1 in the subnet mask of 255.255.255.0. We can have group of other IP in the same network address which they can communicate each other from
192.168.2.0 - 192.168.2.255.
However, it is a good idea to leave out the first and the last IP because most firewall will use these two for specific purposes.
For how to calculate this group, check out this link.
For how to use it into the firewall, check this link.
Sunday, July 30, 2006
Mathcad VS Mathematica
I always love using mathematic tools for my works. They are extremely useful if you know what I mean. There are a lot of mathematic tools these day -- Mathcad, Mathematica, Matlab -- just to name a few. Out of the three, Matlab is the most flexible, but when it comes to a quick solving, the first two are my choices. When I want to do general calculations, I'll use Mathcad because it is very easy to write equations or symbols. However, when I want to do a symbolic calculation, I'll use Mathematica.
To compare the power of symbolic calculations of both tools, try to do the integral of x/(b+a-sqrt(a^2-x^2))^2 in both Mathcad and Mathematica. You'll be amazed by the power of Mathematica. Try it.
To compare the power of symbolic calculations of both tools, try to do the integral of x/(b+a-sqrt(a^2-x^2))^2 in both Mathcad and Mathematica. You'll be amazed by the power of Mathematica. Try it.
Sunday, April 16, 2006
Printing a long web page
One of my friends asked me how to efficiently print out a very long web page. He wanted as much as possible of the content on the page to fit into 1 pape so he can save his valuable papers.
This is interesting.
Say you use IE to browse the internet. You find an interesting page, and want to print it out for later reading. Often, you will find some contents of the printed page missing. Sometimes are at the long end, sometimes are at the width end. What a nuisance !
I had this problem before. My problem is solved by the help of a utility called "Fineprint".
LINK
After you install "Fineprint", you will have another virtual printer called, "Fineprint" in your printer folder. If you print anything throught this fineprint printer, it will give you a lot of options to play with your printout.
Let's focus on only the printing of the long page.
When you want to print a long web page, you will do this (after the fineprint is installed):
1. Click the "Print Preview", and see if the page you want fits in 1 page or it covers enought content.
2. If you want it to cover more contents, click "Page Setup" icon.
3. In page setup, change the paper size to make it bigger, longer or whatever to make it cover all of your contents
4. Click OK to bring you back to the page setup window. Now more of your contents should go into 1 page. Repeat steps 3 and 4 to suit your need
5. Click "Print ..." and set your page range, hightlight Fineprint printer, then click "Print" button. This will invoke the "Fineprint" window.
6. Adjust the Layout. Check the last preview, then click "Print and Close" to do a real printing.
It is not complicate as it seems. Give it a try.
This is interesting.
Say you use IE to browse the internet. You find an interesting page, and want to print it out for later reading. Often, you will find some contents of the printed page missing. Sometimes are at the long end, sometimes are at the width end. What a nuisance !
I had this problem before. My problem is solved by the help of a utility called "Fineprint".
LINK
After you install "Fineprint", you will have another virtual printer called, "Fineprint" in your printer folder. If you print anything throught this fineprint printer, it will give you a lot of options to play with your printout.
Let's focus on only the printing of the long page.
When you want to print a long web page, you will do this (after the fineprint is installed):
1. Click the "Print Preview", and see if the page you want fits in 1 page or it covers enought content.
2. If you want it to cover more contents, click "Page Setup" icon.
3. In page setup, change the paper size to make it bigger, longer or whatever to make it cover all of your contents
4. Click OK to bring you back to the page setup window. Now more of your contents should go into 1 page. Repeat steps 3 and 4 to suit your need
5. Click "Print ..." and set your page range, hightlight Fineprint printer, then click "Print" button. This will invoke the "Fineprint" window.
6. Adjust the Layout. Check the last preview, then click "Print and Close" to do a real printing.
It is not complicate as it seems. Give it a try.
Thursday, April 13, 2006
Free Digital Magazines
Yea ;) You don't have to go outside to buy your favorite magazines anymore. They are free right in front of you. Tens of magazines in digital format can be yours for free. Check this link out.
Link
You need to install the ZINIO reader in order to read these magazines. Get the reader software from the above link.
Link
You need to install the ZINIO reader in order to read these magazines. Get the reader software from the above link.
Thursday, April 06, 2006
TV Antenna
My house is equipped with the big TV antenna. It cost around 3000B 2 year ago. That was super expensive. My mom hesitated to spend that much money on it at first. After a big discussion among our family members, my mom gave it a go. After all, we just wanted to see a clear TV.
It never happened.
After the technician installed the new antenna for us, we all had high hope. It looked beautiful on our roof from the outside but.. my oh my , it was useless when we went inside to watch our TV.
The technician claimed the tall buildings around our house were at fault. They kept away the TV signals from our antenna. The only solution is installation of another new equipment to boost the TV signal called the TV booster, which would cost another 2000B !
No doubt my mom couldn't let it happen again.
This sucked. We spent 3000B for nothing.
I felt sorry for myself too. I was the one who suggested the family about the new antenna. Too bad my good intention was wasted.
I think I'm done with the antenna. Next time I will go for cable TV.
It never happened.
After the technician installed the new antenna for us, we all had high hope. It looked beautiful on our roof from the outside but.. my oh my , it was useless when we went inside to watch our TV.
The technician claimed the tall buildings around our house were at fault. They kept away the TV signals from our antenna. The only solution is installation of another new equipment to boost the TV signal called the TV booster, which would cost another 2000B !
No doubt my mom couldn't let it happen again.
This sucked. We spent 3000B for nothing.
I felt sorry for myself too. I was the one who suggested the family about the new antenna. Too bad my good intention was wasted.
I think I'm done with the antenna. Next time I will go for cable TV.
Subscribe to:
Posts (Atom)