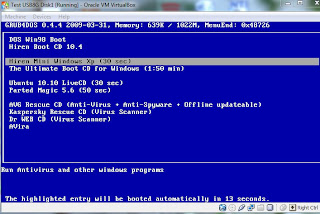
OK. There are a lot of tutorials about how to make a multipleboot USB. Why do I have to make one myself? The answer is that most tutorials are very confusing and they won't explain the reason behind those instructions lines. Here is my own version. If you feel it is familiar, that's because I collect all these information from the internet.
Note this uses GRUB4DOS as a boot loader to load an OS, and there is no partitioning of USB involved. Obviously, this is an advantage over other methods. The USB size should be at least 8G.
Words of warning: The files in USB can be corrupted easily as you may be forced to shut down the system in case you cannot boot up the system as expected. I recommend to back up all the file in USB. If something used to work before, then suddenly goes wrong, just repeat step 1 and 2, and copy everything in the backup to the USB.
Tools: HP USB Disk Storage Format Tool 2.2.3, Syslinux, Grub4dos
Objectives: Making a USB bootable with 15 instances: DOS, Hiren Boot CD, Hiren Mini XP, UBCD for Win, Ubuntu, Part Magic, AVG, Kaspersky, Dr Web, Avira Antivir, MS Data recovery XP-Win7, WindowsKey and so on.
Step 1: Make a USB
Use HP utility to format the USB stick. Use this tool to format the USB stick because it will prepare the stick's boot sector properly just for the next step.
Step 2: Install SYSLINUX boot loader into the mbr of the USB, using command syslinux -m -a X: , which X is a USB drive. After install the syslinux bootloader, a file ldlinux.sys will be created in the root of USB. (Note that you may try using GRUB bootloader but I found using GRUB cause nonbooting with AVG rescue CD iso. See Update***)
Step 3: Copy GRUB shell into USB
GRUB shell is GRUB.EXE, we have to copy GRUB.EXE into the root of USB, then create a text file syslinux.cfg. Call GRUB.EXE with these lines in a syslinux.cfg file.
default grub
LABEL grub
KERNEL grub.exe
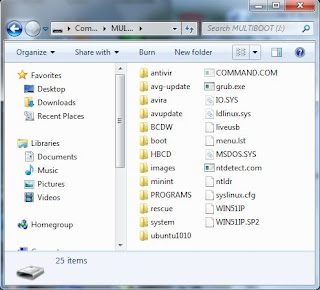
Now your USB root should have 3 files, ldlinux.sys, syslinux.cfg and grub.exe
(If you use GRUB bootloader, copy GRLDR into the root of USB instead of grub.exe.)
***UPDATE Step 2-3 Install New GRUB bootloader and GLDR
New
grub4dos 0.4.5c (2013-01-13) has been released. I found it works really well. It can now boot the new Knoppix7 ISO, and does not have any issue with AVG ISO
. After formatting the USB in Step 1, you can install grub bootloader and gldr to your USB in one step using
RMPrepUSB (Set Partition size to MAX, Bootloader option to MSDOS, File system to FAT32/ Boot as HDD, and click Install Grub4Dos.) Note that RMPrepUSB has already included the new grub bootloader and glrdr in its package so you don't have to separately download the new grub again. Another way to install GRUB bootloader is to use BOOTLACE.COM included with grub4dos package. Use BOOTLACE.COM 0x80 to install the bootloader to disk0, use BOOTLACE.COM 0x81 to install the bootloader to disk1, and so on. Check the disk number with MBRWIZ.
After this step, your USB should have only 1 file, glrdr.
Step4: Set the first boot, Windows98 MSDOS
Now we are ready for the first boot menu, windows98 DOS. Copy these files from win98 CD into the root of USB, MSDOS.SYS, IO.SYS and COMMAND.COM
Create a text menu file to call this boot stance by putting these lines into a text menu.lst file:
color white/blue black/light-gray
timeout 20
default 5
title Shut down
halt
title Reboot
reboot
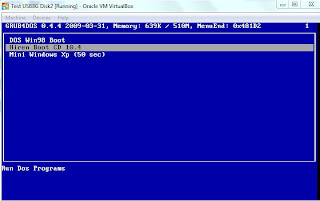
title DOS Win98 Boot
rootnoverify (hd0,0)
chainloader /io.sys
The first 3 lines are for appearance's setting. Next two title entries are for power off and restart the machine.
The next lines can be explained as following:
title DOS Win98 Boot :The display boot menu.
rootnoverify (hd0,0) :Set the first hard disk (the USB stick itself in this case) and first partition as root without mounting disk.
chainloader /io.sys :Load io.sys in the root to boot.
After reboot with this USB, you should get this screen.
 Step 5: Set Hiren Boot CD, Hiren Mini XP
Copy HBCD folder in a Hiren Boot CD into the root of USB drive. Note that we do not boot Hiren from the ISO, but we boot it from its boot file. Add the following lines in the menu.lst file:
title Hiren Boot CD 10.4\nRun Dos Programs
find --set-root /HBCD/boot.gz
kernel /HBCD/memdisk
initrd /HBCD/boot.gz
title Mini Windows Xp (50 sec)\nRun Antivirus and other windows programs
find --set-root /HBCD/XPLOADER.BIN
chainloader /HBCD/XPLOADER.BIN

 Step6: Set UBCD for Windows
We need another USB drive. Create UBCD4Win with UBUSB.EXE to the new USB drive. Then copy the following files and folders from the UBCD4Win USB to our USB:
Folders: UBCDW, MININT, PROGRAMS
Files: ntdetect.com, ntldr, win51ip, win51ip.sp2
Add the following lines to our menu.lst:
title Launch "The Ultimate Boot CD for Windows"
fallback 1
find --set-root /ntldr
chainloader /ntldr
savedefault --wait=2

 Step 7: Set UBuntu
Create a folder for UBUNTU e.g.
ubuntu1010 in the root of USB drive, and extract 6 following files-- filesystem.manifest, filesystem.manifest-desktop, filesystem.size, file system.squashfs, initrd.lz and vmlinuz from UBUNTU iso CD into this folder.
Add the following lines in menu.lst
#This is for a space
title
root
title Ubuntu 10.10 LiveCD (30 sec)
find --set-root /ubuntu1010/initrd.lz
kernel /ubuntu1010/vmlinuz boot=casper live-media-path=/ubuntu1010/ ignore_uuid
initrd /ubuntu1010/initrd.lz
Caution: Ubuntu 10.10 has a problem with directory named "sources". I don't know why. If your USB has a directory named "sources" anywhere in the USB, it won't load Ubuntu. Strange. At least, I'm glad I found why sometime I can't load Ubuntu. It has bugged me for long time.
Step 8: Set Parted Magic
Create a
folder
images in the root of USB drive, and copy partedmagic iso into this folder
Add the following lines in menu.lst
title Parted Magic 5.6 (50 sec)
find --set-root /images/pmagic-5.6.iso
map --heads=0 --sectors-per-track=0 /images/pmagic-5.6.iso (hd32)
map --hook
root (hd32)
chainloader (hd32)
Now you USB should have 2 G used, and 6 menus showing up in the USB root directory.

 Step 9: Set AVG antivirus rescue CD
 (On/off line update)
Download AVG antivirus rescue CD and copy into images folder of our USB
Create avg-update directory for keeping the virus database. This is not a must, but it is good to have a specific directory for downloading virus definition.
Add the following lines in menu.lst
#This is for a space
title
root
title AVG Rescue CD (Anti-Virus + Anti-Spyware)
find --set-root /images/avg.iso
map /images/avg.iso (hd32)
map --hook
chainloader (hd32)
This antivirus rescue CD can be updated online/offline. To update it, select Update, then select Online, Offline or Download.
Step 10: Set KAPERKY RESCUE CD (On/off line update)
This rescue CD can be updated online inside the program or offline by downloading a new iso.
Rename "kav_rescue.iso" to rescue.iso, and put it in a newly created RESCUE folder
Create a zero file named
liveusb in the root of USB.
Add the following lines in menu.lst
title Kaspersky Rescue CD (Virus Scanner)\nUpdated by downloading the new iso, rename it to rescue.iso, and replace the old iso in a rescue directory
find --set-root /rescue/rescue.iso
map /rescue/rescue.iso (0xff)
map --hook
root (0xff)
chainloader (0xff)
This program doesn't work on all systems, e.g. on some notebooks. Still don't know why.
Step 11: Set Dr WEB Live USB
You will need an extra USB. Download DrWebLiveUSB.EXE and make a DrWebLiveUSB to this USB.
Copy the whole boot directory to the root of our USB
Add the following lines in menu.lst
Edit ID=xxxxxxxxxxxxxx as the same in isolinux.cfg (Text in the line starting with kernel as the same as in syslinux.cfg without ID=)
title Dr WEB CD (Virus Scanner)\nUpdated by downloading the new iso, and extract boot directory to the root of USB
find --set-root /boot/initrd
kernel /boot/vmlinuz ID=WfHmREDlRSXOT6wb root=/dev/ram0 init=/linuxrc init_opts=4 quiet dokeymap looptype=squashfs loop=/boot/module/white.mo usbroot slowusb vga=791 splash=silent,theme:drweb CONSOLE=/dev/tty1
initrd=/boot/initrd
Step 12: Set AVIRA AntiVir Live CD (Online update)
Prepare an extra USB.
Download avira rescue cd iso and make USB version by UnetBootin on the extra USB.
Copy 3 folders (avupdate, antivir, and system) from the extra USB to the root of our USB
Add the following lines in menu.lst
title AVira
find --set-root /avira/initrd.gz
kernel /avira/vmlinuz nofb ramdisk_size=108178 root=/dev/ram0 rw console=/dev/vc/4
initrd /avira/initrd.gz
This program can be updated online only.

 Step 13 Add F-Secure (On/offline update)
Download F-secure rescue cd iso. Use UNetBootin to make a spared USB bootable. Copy boot/isolinux and Knoppix directory in the root of our USB. Notice the text file, syslinux.cfg. It should have these lines of codes:
label ubnentry0
menu label rescuecd
kernel /boot/isolinux/fsecure/linux
append initrd=/boot/isolinux/fsecure/minirt.gz ramdisk_size=100000 lang=en vt.default_utf8=0 apm=power-off vga=normal quiet nomce loglevel=1 nolapic_timer nosound console=tty10 video=noblank
Now we will adapt this code into grub4dos of our menu.lst as follows:
title F-Secure Rescue CD
find --set-root /boot/isolinux/fsecure/minirt.gz
kernel /boot/isolinux/fsecure/linux ramdisk_size=100000 lang=en vt.default_utf8=0 apm=power-off vga=normal quiet nomce loglevel=1 nolapic_timer nosound console=tty10 video=noblank
initrd /boot/isolinux/fsecure/minirt.gz
If the system can connect to the internet, the virus database can be updated online. If not, it can be updated offline by put the virus database into the main root of the USB, downloaded from
http://download.f-secure.com/latest/fsdbupdate9-packed.run
Step 14 Add Panda Safe CD
Download Panda SafeCD iso, then extract all files in directory "live" to a folder "panda" in your USB stick, then add these lines in "menu.lst".
title Panda Safe CD (20 sec)
find --set-root /panda/initrd1.img
kernel /panda/vmlinuz1 boot=live live-media-path=/panda/ ignore_uuid
initrd /panda/initrd1.img
Step 15 Add Bitdefender Live CD
Step 16 Add Knoppix Live CD
Step 17 Add


